
Have you ever been in the middle of cooking dinner when you notice a dripping faucet, a slow sink, or a strange gurgling sound under the counter? It is a small problem at first, but it can quickly turn into a frustrating mess. That is exactly why kitchen plumbing basics matter so much. When you understand how your kitchen plumbing works, you can handle simple problems with more confidence, save money on service calls, and stop small issues from becoming big repairs.
The good news is that kitchen plumbing is not as complicated as it sounds. You do not need to be a professional plumber to understand the main parts. You just need a simple grasp of the pipes, drains, traps, valves, and fixtures that keep water moving in and out of your kitchen the right way. Once you know those basics, you can make smarter decisions, spot trouble early, and use the right tools for small repairs.
If you have ever wanted to try a few DIY kitchen plumbing tools and save time and money, this article is for you. Read on for a beginner-friendly toolkit list and practical tips you can actually use at home.
Kitchen Plumbing Basics Explained
Why these basics matter
Before you reach for any wrench or plunger, it helps to understand what is happening behind the cabinet doors. Kitchen plumbing is a small system, but it has several parts working together simultaneously. If one part fails, you may notice leaks, slow drains, foul odours, or reduced water flow.
The best thing about learning kitchen plumbing basics is that it gives you control. You do not need to guess what is wrong. You can inspect the right area, use the right tool, and make a more informed repair.
The main parts of a kitchen plumbing system
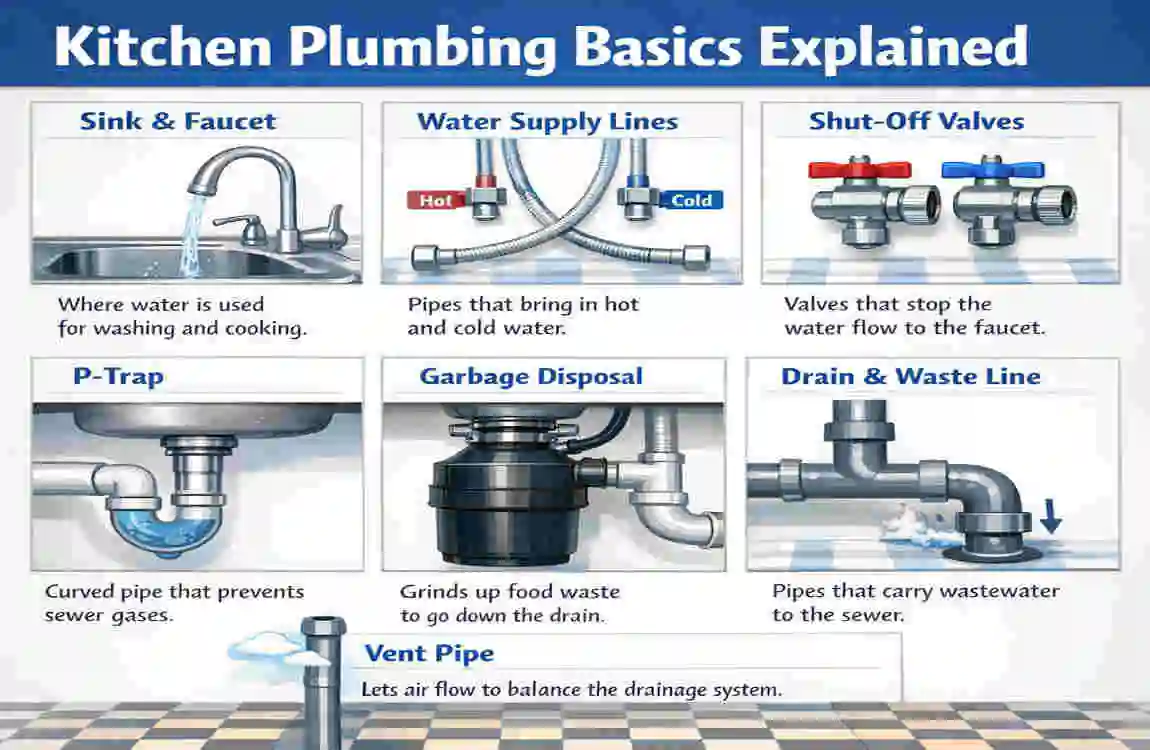
A kitchen plumbing system usually includes the following:
- Water supply lines that bring hot and cold water to the faucet
- Shutoff valves that let you stop water flow during repairs
- Faucet fixtures that control how water comes out
- Drain lines that carry wastewater away
- P-traps that block sewer gas from coming back into the kitchen
- Garbage disposal units in some kitchens
- Dishwasher supply and drain lines in kitchens with dishwashers
Each part has a job. When they all work properly, you barely notice them. When something goes wrong, the problem becomes obvious fast.
Water supply lines
Water supply lines are the pipes or flexible hoses that deliver fresh water to your kitchen faucet. Most kitchens have one line for hot water and one for cold water. These lines are usually tucked under the sink, where they connect to the shutoff valves and then to the faucet.
If you see water dripping under the sink or around the valve connection, the supply line may be loose, worn out, or cracked. A small leak here can slowly damage cabinets and flooring, so it should never be ignored.
Drain lines and P-traps
Drain lines do the opposite job. They carry dirty water from the sink into your home’s drainage system. Right under the sink, you will usually find a P-trap, which is a curved piece of pipe shaped a bit like the letter P on its side.
The P-trap is important because it keeps a small amount of water inside the bend. That water acts as a barrier, helping block unpleasant sewer gases from rising back into your kitchen. If the trap gets clogged with grease, food particles, or soap buildup, water may drain slowly or stop draining altogether.
Shutoff valves
Shutoff valves are small but very important. They let you turn off the water to the faucet without shutting down the entire house. Most sinks have one valve for hot water and one for cold water.
These valves are useful during repairs. If your faucet leaks or your hose needs replacement, you can stop the water at the sink instead of dealing with a bigger mess. Over time, valves may become stiff, corroded, or difficult to turn. That is why it is smart to test them regularly.
Fixtures: sink, faucet, and disposal
Fixtures are the visible parts you use every day. In the kitchen, that usually means the sink, faucet, sprayer, and maybe the garbage disposal. These parts connect to the plumbing system, but they also get the most daily wear and tear.
A faucet may drip because of worn washers or cartridges. A sink may leak around the seal. A disposal may jam if something hard or fibrous is inside. When you understand the system as a whole, these problems are easier to trace.
How the system works together
Think of your kitchen plumbing like a simple loop. Water comes in through the supply lines, passes through the faucet, and is used for washing dishes, cooking, and cleaning. Then the used water leaves through the drain, passes through the trap, and flows into the main sewer or septic line.
That loop depends on every part doing its job.
Here is a simple reference table to help you picture it clearly:
ComponentFunctionCommon Issues
Water Supply Lines deliver hot and cold water to the faucet. Leaks at connections, cracks, and loose fittings.
Drain Lines & Traps Remove wastewater and block gases. Clogs from grease, food scraps, and soap buildup.
Valves Control and isolate water flow, corrosion, stiffness, and failure to close
Faucets let you control water output, drips, low flow, and worn internal parts.
A garbage disposal breaks down food waste. Jams, humming noise, reset issues
Dishwasher Lines: Carry water in and out of the dishwasher. Loose hoses, leaks, blockages
A simple way to think about it
If you want an easy mental picture, imagine your kitchen plumbing as two roads:
- One road brings clean water in
- Another road carries dirty water out
The faucet sits in the middle like a gatekeeper. The trap sits below like a safety guard. And the valves act like emergency switches.
Once you understand that, the whole system becomes much easier to work with. You can look at a problem and ask, Is this an inlet issue, a drain issue, or a fixture issue? That question alone can save time and frustration.
Essential Tools for Kitchen Plumbing Repairs
Why the right tools matter
Having the right tools makes a huge difference in plumbing work. You can fix more problems safely, avoid damaging fittings, and feel much less stressed while working under the sink. In many cases, beginners struggle not because the job is too hard, but because they are using the wrong tool or forcing the wrong size.
When people search for tools for kitchen plumbing repairs or tools needed for kitchen sink plumbing, they are usually looking for a simple starter kit. That is a smart place to begin. You do not need a truck full of equipment. You just need a few reliable tools that cover the most common jobs.
Adjustable Wrench and Pipe Wrench
An adjustable wrench is one of the most useful tools in any home repair kit. It works with nuts and bolts of different sizes, making it perfect for faucet parts, supply line fittings, and shutoff valve connections. A pipe wrench is larger and stronger, so it provides more grip on metal pipes and older fittings.
When working under a sink, one wrench may hold a fitting in place while the other turns the nut. This helps prevent stripping or over-tightening parts. Using two wrenches together is a simple trick that can help prevent damage to connections.
For example, if you are loosening a stubborn supply line, one wrench can steady the valve while the other turns the connector. That extra support matters, especially with older plumbing that may already be fragile.
Image idea: A close-up of an adjustable wrench and pipe wrench beside sink fittings.
Basin Wrench
A basin wrench is one of those tools that beginners often do not know about until they really need it. It is designed to reach behind a sink where normal wrenches cannot fit. That makes it ideal for tightening or loosening faucet nuts in tight spaces.
If you have ever tried to work under a kitchen sink, you know how cramped it can be. The basin wrench features a long handle and a pivoting jaw, helping you reach awkward spots with less frustration. It is especially helpful when replacing a faucet or tightening a loose mount.
If you are planning even one faucet repair, this tool is worth having.
Image idea: Basin wrench reaching behind a sink basin.
Plunger and Drain Auger
A plunger and a drain auger are must-have tools for clogs. They handle two different levels of blockage.
A plunger helps dislodge soft clogs close to the drain opening. For kitchen sinks, a standard cup plunger is usually used. However, many homeowners also keep a flange plunger on hand for greater flexibility. You want a good seal over the drain so the pressure works effectively.
A drain auger, also called a snake, is better for clogs deeper in the pipe. You feed the flexible cable into the drain, turn the handle, and break up or pull out the blockage. This is especially helpful if grease, food waste, or soap buildup is slowing the drain.
Use the plunger first for simple clogs. If that does not work, bring in the auger. That order is often the easiest and safest.
Image idea: A sink plunger, hand auger, and drain opening laid out together.
Pliers Set: Needle-Nose and Channel-Lock
Pliers are essential because kitchen plumbing often involves small parts in tight spaces. Needle-nose pliers are great for grabbing tiny washers, clips, or screws. Channel-lock pliers give you a stronger grip for larger nuts, fittings, and hoses.
You will often need pliers when dealing with faucet parts, drain assemblies, or disposal connections. They help you hold, twist, pull, and reposition pieces that are too small for your hands alone.
If you are trying to remove a small clip from a faucet handle or steady a hose while loosening a connector, pliers can make the task much easier.
Pipe Cutter and Hacksaw
Sometimes a repair needs a clean cut. That is where a pipe cutter or hacksaw comes in. A pipe cutter gives you a neat, controlled cut on plastic or metal tubing. A hacksaw can also be used to cut pipe, bolts, or old fittings.
A clean cut matters because rough edges can cause poor connections, leaks, or future damage. If you are replacing a section of drain pipe or supply line, this tool helps you work more accurately.
For beginners, a pipe cutter is often easier to control than a hacksaw, especially in tight spaces.
Image idea: Pipe cutter next to pieces of PVC or copper pipe.
Teflon Tape and Plumber’s Putty
These are small items, but they play a big role in preventing leaks.
Teflon tape is wrapped around threaded pipe connections to help seal them more tightly. It helps reduce drips at threaded joints and makes fittings easier to remove later.
Plumber’s putty is a soft sealing material used around sink strainers, drains, and some fixtures. It helps create a watertight seal where parts meet.
These two supplies are inexpensive, easy to store, and very helpful for beginner plumbing jobs. They should be in every starter kit.
Image idea: Roll of Teflon tape and a small container of plumber’s putty.
Toolkit checklist for kitchen plumbing repairs
Here is a simple checklist you can use when building your starter kit:
Tool Best For Beginner Tip
Adjustable wrench, loosening and tightening nuts. Buy one with a smooth jaw adjustment.
Pipe wrench: Grip on metal pipe fittings. Use carefully to avoid marking soft metal.
Basin wrench: Tight spaces behind sinks. Ideal for faucet installation and removal.
Plunger: Clearing shallow clogs. Make sure you have a good seal
Drain auger, reaching deeper blockages. Turn slowly to avoid damaging pipes
Needle-nose pliers, small clips, and parts. Keep a pair with insulated handles if possible
Channel-lock pliers, strong grip on larger fittings, great for slippery nuts and hoses
Pipe cutter, clean cuts on pipe or tubing, better than forcing a rough break
Hacksaw cutting old fittings and bolts. Use a fine-tooth blade if possible
Teflon tape, Thread sealing, Wrap in the direction of the threads
Plumbers’ putty seals drains and sink fixtures. Do not overuse; a small amount is enough.
Beginner pro tip
Invest in decent-quality tools from the start. Cheap tools may slip, bend, or break, turning a simple repair into a stressful one. A small, reliable toolkit will pay for itself over time by making every repair easier and less frustrating.
Step-by-Step Common Kitchen Repairs
Start with safety and patience.
Now that you know the basics and have the right tools, it is time to apply them. The most common kitchen repair jobs are usually simple once you break them into steps. The key is not to rush.
When you work slowly and check each step, you reduce the chance of leaks, broken parts, and wasted effort. Remember, confidence comes from understanding, not from guessing.
Fixing a Leaky Faucet
A dripping faucet is one of the most common kitchen plumbing problems. It may seem small, but it wastes water, raises your utility bill, and drives you crazy at night.
What you may need
- Adjustable wrench
- Basin wrench
- Screwdriver
- Replacement washer, cartridge, or O-ring
- Teflon tape
- A towel or small container for parts
Step-by-step guide
- Turn off the water supply.
- Find the shutoff valves under the sink and turn them clockwise until they stop. Then turn the faucet on to release any pressure left in the line.
- Cover the drain.
- This keeps screws, caps, and small parts from falling into the sink.
- Remove the faucet handle.
- Use a screwdriver or the proper wrench, depending on the faucet type.
- Inspect the internal parts.
- Look for worn washers, damaged cartridges, or loose seals.
- Replace the faulty part.
- Match the replacement with the old part as closely as possible.
- Wrap threaded connections if needed.
- Use Teflon tape on threaded fittings to help create a tighter seal.
- Reassemble the faucet and test it.
- Turn the water back on slowly and check for drips.
A faucet leak is often caused by a small, worn-out part, not a major failure. That is why this is such a good beginner repair. It teaches you how kitchen fixtures work without demanding advanced skills.
A quick note on faucet types
Not all faucets are the same. Some use compression parts, while others use cartridges or ceramic disks. If you are not sure which type you have, take a photo before you disassemble anything. That makes it much easier to find the right replacement.
Unclogging Sink Drains
A slow or clogged kitchen drain usually builds up over time. Grease, food scraps, soap residue, and even coffee grounds can create trouble.
What you may need
- Plunger
- Drain auger
- Bucket
- Gloves
- Adjustable pliers
- Small brush or old toothbrush
Step-by-step guide
- Try the plunger first.
- Fill the sink with a little water so the plunger can seal properly. Then plunge several times firmly.
- Check the results.
- If the water starts draining more freely, the clog may already be loosening.
- Use the drain auger if needed.
- Feed the cable into the drain slowly. Turn the handle as you push. This helps the auger grab or break the blockage.
- Remove and inspect the P-trap if the clog remains.
- Put a bucket under the trap before loosening it. You may find grease, food debris, or other buildup inside.
- Clean the trap and reconnect it.
- Wipe out the inside, reattach the parts, and make sure the connections are snug.
- Run water to test the drain.
- Watch closely for leaks around the trap and joints.
A clogged sink can seem like a major issue. Still, many blockages are actually near the drain opening or inside the trap. That means the right tools can fix the problem without expensive help.
What not to do
Avoid pouring harsh chemicals down the drain first. They may not solve the problem, and they can damage pipes or make the repair more dangerous later. Mechanical cleaning is usually the safer first step.
Garbage Disposal Issues
A garbage disposal is useful, but it can also create confusion when it stops working. Sometimes the unit is jammed. Sometimes it just needs a reset. Other times, a connection is loose.
What you may need
- Wrenches
- Channel-lock pliers
- Flashlight
- Wooden spoon or disposal wrench, if provided by the model
Basic troubleshooting steps
- Turn off the power.
- Never work on the disposal while it may still be energised.
- Look for a reset button.
- Many disposals have one underneath the unit. If it has tripped, pressing it may solve the issue.
- Check for jams.
- Use the proper tool or the manufacturer’s recommended method to free the blades. Never put your hand inside the disposal.
- Inspect the drain and mounting connections.
- Loose fittings can cause leaks or vibration.
- Test the unit.
- Restore power and run water while turning the disposal on again.
If the disposal hums but does not spin, it may be jammed. If it leaks, the problem may be at the sink flange, drain pipe, or hose connection. Basic tools can help you inspect and correct these issues.
A useful habit
Before you reset or repair a disposal, always check that the sink is draining properly. A disposal problem and a drain clog can happen at the same time, and one can hide the other.
Dishwasher Supply Line Repair
Dishwashers depend on both the water supply and the drain connections. A small leak at the supply line can drip under the cabinet and remain unnoticed for a long time.
What you may need
- Adjustable wrench
- Pliers
- Teflon tape
- Replacement hose or fitting
- Bucket or towel
Step-by-step guide
- Turn off the water and power.
- Safety comes first. Shut off the water supply and, if necessary, disconnect the dishwasher from power.
- Check the supply line connection.
- Tighten loose fittings carefully, but do not over-tighten.
- Inspect the hose for cracks or wear.
- If the hose appears damaged, replace it rather than patch it.
- Check the drain hose too.
- Sometimes leaks or drainage problems involve the waste line, not the supply line.
- Use Teflon tape on threaded fittings if appropriate.
- This can help reduce leaks at the connection point.
- Test the system.
- Run the dishwasher and watch the connections closely.
Dishwasher lines are often hidden, so leaks can go unnoticed until they cause damage. That is why a quick monthly check is smart, especially in older kitchens.
Safety reminder
If you are not sure where the leak is coming from, stop and inspect carefully. A hidden leak can damage cabinets, flooring, and even drywall if left alone too long.
Safety and Maintenance Tips
Why prevention matters
The easiest plumbing repair is the one you never have to make. Good maintenance helps you avoid sudden leaks, clogs, and expensive service calls. It also helps you stay safe while working under the sink.
Many home plumbing problems begin as small warning signs. A slow drain. A tiny drip. A valve that is harder to turn than it used to be. When you pay attention early, you can often prevent a much larger issue.
Before every repair
Before you begin any repair, do these basic safety steps:
- Find the main shutoff valve
- Turn off the local water supply if possible
- Disconnect power to any appliance involved
- Wear gloves and safety goggles
- Keep a towel or bucket nearby
- Make sure the area is well-lit
These steps sound simple, but they matter a lot. Water and electricity should never be treated casually. Even a small repair deserves a careful setup.
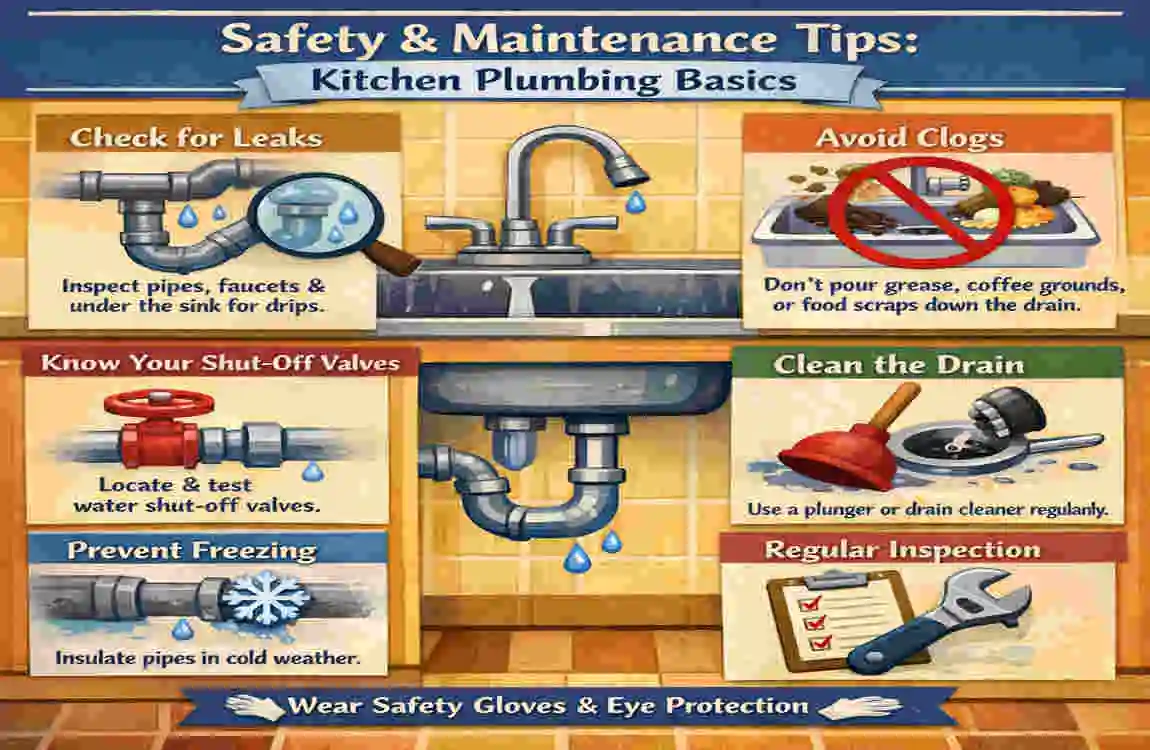
Routine maintenance habits that help
A little maintenance goes a long way. Try building these habits into your home routine:
- Check under the sink once a month for moisture
- Clean the P-trap if the drain starts slowing down
- Avoid pouring grease down the drain
- Run warm water after using the sink
- Inspect supply lines and valves for rust or wear
- Test the shutoff valves once or twice a year
- Look for cabinet swelling or water stains
These small actions can stop many common problems before they grow.
Why does grease cause trouble?
Grease may look harmless when it is warm and liquid, but it hardens as it cools. That sticky buildup clings to pipes and catches food particles. Over time, it narrows the drain line, creating a clog.
To keep your kitchen plumbing healthy, avoid sending cooking oil, butter, and grease down the sink. Wipe greasy pans with a paper towel first and throw the waste into the trash.
When to call a professional
DIY is great for simple repairs, but some jobs are better left to a plumber. Call a professional if you notice:
- A major leak you cannot stop
- Corroded or broken pipes
- Persistent sewer smells
- Repeated clogs that keep coming back
- Water damage around cabinets or walls
- Problems with the main drain line
- Electrical concerns near the disposal or dishwasher
Knowing your limits is part of being a smart homeowner. There is no shame in asking for help when the problem is beyond the scope of basic tools and repair steps.
Why regular inspections save money
Many plumbing pros say routine checks catch the majority of common issues before they become emergencies. That makes sense. A quick look under the sink can reveal a loose fitting, a damp line, or a tiny drip long before it becomes a costly repair.
If you live in an area with hard water, older plumbing, or heavy kitchen use, inspections matter even more. A little attention now can prevent a major headache later.
FAQs on Kitchen Plumbing Basics
What are kitchen plumbing basics?
Kitchen plumbing basics are the simple parts and functions of the plumbing system in your kitchen. This includes the water supply lines, shutoff valves, faucet, drain lines, P-trap, garbage disposal, and dishwasher connections. Once you understand these parts, simple repairs become much easier to handle.
What tools do I need for DIY kitchen plumbing repairs?
A good starter kit usually includes an adjustable wrench, basin wrench, pliers, plunger, drain auger, pipe cutter, Teflon tape, and plumber’s putty. These are the most useful DIY kitchen plumbing tools for common sink, faucet, and drain repairs.
How do I stop a kitchen sink leak quickly?
First, turn off the water at the shutoff valves under the sink. Then place a bucket or towel below the leak. If the leak is at a loose fitting, tighten it gently. If the leak continues, inspect the washer, hose, or seal and replace the damaged part.
Why does my kitchen sink drain slowly?
A slow kitchen sink drain usually indicates a partial clog. Grease, food scraps, soap residue, and small debris often build up in the drain line or trap. Try plunging first, then use a drain auger if needed. If the problem stays, check and clean the P-trap.
Can I use chemical drain cleaners in my kitchen sink?
It is better to avoid them if possible. Chemical cleaners can damage pipes, harm finishes, and make future repairs more dangerous. A plunger, auger, or trap cleaning is usually a safer first choice.
What is the P-trap under my sink for?
The P-trap holds a small amount of water that prevents sewer gas from entering your kitchen. It also catches some debris before it moves deeper into the drain line. That makes it an important part of the plumbing system.
When should I call a plumber instead of doing it myself?
Call a plumber if you have a large leak, broken pipe, repeated clogs, major water damage, or any repair that feels too complex or unsafe. It is always better to get help early than to make the problem worse.