
Picture this: It is the middle of a freezing January night. You walk into your living room expecting a wave of cozy warmth, but instead, you are met with a harsh, chilly draft. You place your hand on your radiator, only to find that the bottom is completely cold while the top is barely lukewarm. If this sounds familiar, you are not alone.
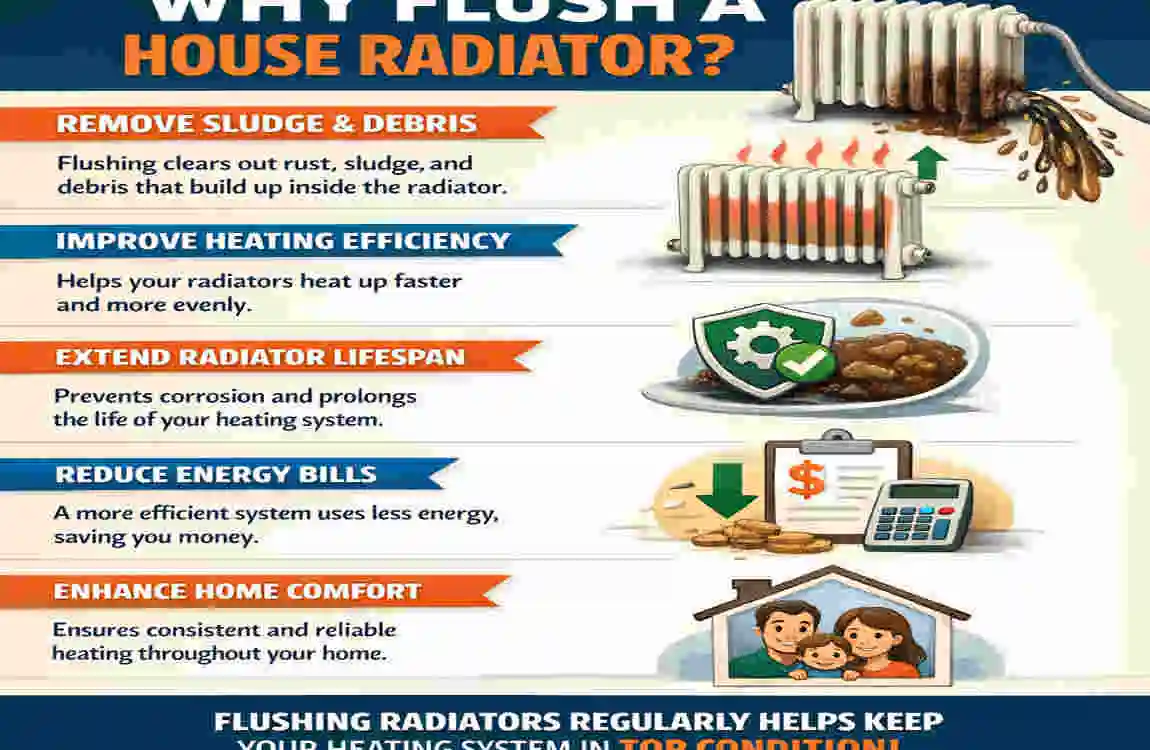
Over time, air-based or central-heating radiators naturally accumulate a nasty mixture of rust, dirt, and metallic debris. This dark, thick mixture is commonly known as “radiator sludge.” When this sludge builds up, it blocks the flow of hot water, completely crippling your heating system and leaving your home uncomfortable.
Fortunately, you do not need to spend hundreds of dollars on a professional plumber to fix this common issue. You can tackle this problem yourself using a simple tool you likely already have sitting in your garage or backyard. Using a standard garden hose is an incredibly simple, affordable, and effective DIY method for homeowners everywhere.
Why You Need to Flush a House Radiator
Before we grab our tools and start turning wrenches, it is important to understand exactly what is happening inside your heating system. Water constantly flows through your home’s pipes and metal radiators. Over the years, the water reacts with the metal inside the system, causing microscopic bits of rust to flake off.
This rust mixes with dirt, limescale, and water to create a heavy, dark, mud-like substance. Because this sludge is denser than water, it naturally settles to the bottom of your radiators. This creates a physical barrier that prevents hot water from circulating properly.
If you are wondering whether your luxury home is suffering from this issue, there are several common symptoms of a dirty radiator you can look out for. The most obvious sign is discovering cold spots at the bottom or middle of the unit while the top remains hot. You might also notice noticeably slower heating times, meaning it takes hours for a room to warm up.
Furthermore, you might hear strange clanking, banging, or gurgling noises coming from your pipes. These noises occur as the water struggles to push past the blockages. Worst of all, this sludge forces your boiler to work twice as hard to heat your home, which inevitably leads to significantly higher energy bills.
Regular radiator flush maintenance is directly linked to your home heating efficiency and the overall longevity of your system. By taking the time to clear out the sludge in your radiator, you restore the free flow of hot water. Most importantly, regular flushing can prevent incredibly expensive boiler breakdowns or pipe repairs down the line. If you are tired of your radiators not heating properly, a simple flush is usually the magic cure.
Safety First: What to Know Before You Flush
Working with your home’s central heating system is highly rewarding, but it does require some caution. Safety must always come first. Before you even think about disconnecting any pipes, you absolutely must turn off your entire heating system.
Once the system is turned off, you need to exercise patience. Let the radiator cool down completely. The water running through your central heating system can reach scalding temperatures. If you attempt to open a valve while the system is still running or has recently been turned off, you risk severe burns from pressurized, hot water and steam.
In addition to turning off the boiler, you must also shut off the water supply to the specific radiator you are working on. You will also need to release the system pressure by bleeding the radiator slightly before fully disconnecting it.
You should also be aware of the physical risks to your property. Radiator water is incredibly dirty. The black sludge can easily stain your carpets, warp your hardwood floors, and ruin your baseboards. Always prepare for minor leaks and spills. Furthermore, if you live in an older home, your pipes might be severely corroded. Applying too much pressure with a wrench could accidentally crack an old pipe.
It is also crucial to know when to call a qualified plumber rather than do it yourself. If you notice severe leaks around your valves, if your heating system is ancient and heavily rusted, or if your luxury home features highly complex, hidden pipework, it might be best to step back. But if your system is relatively modern and in decent shape, you are perfectly safe to proceed. Just keep these safety rules in mind before you try to flush a house radiator with a garden hose.
What You Need to Flush a Radiator with a Garden Hose
One of the best parts about this DIY project is that it requires very little investment. You do not need highly specialized, expensive plumbing equipment. In fact, most homeowners already have exactly what they need sitting right in their shed.
Here is a quick breakdown of the tools and materials you will need to gather before you start:
- A standard garden hose: Make sure it is long enough to reach from your radiator to an outside drain.
- A wrench or spanner: Two adjustable wrenches are ideal for loosening nuts safely.
- Old towels and a shallow tray: Essential for catching the inevitable black sludge drips.
- A large bucket: To capture the water as you drain the unit.
- A flathead screwdriver: Used to close certain types of valves.
- Radiator bleed key: To release trapped air and pressure.
- Optional but helpful: A hose adapter (to secure the hose to the radiator spout) and a rubber mallet.
By relying on simple household items, this project remains incredibly accessible. Gathering these materials should take no more than a few minutes, reinforcing just how easy this DIY angle truly is.
Prepare the Radiator and Surrounding Area
Now that you have your tools ready, it is time to prepare your workspace. Preparation is the absolute key to success when dealing with indoor plumbing. Rushing this step is a guaranteed way to end up with ruined carpets.
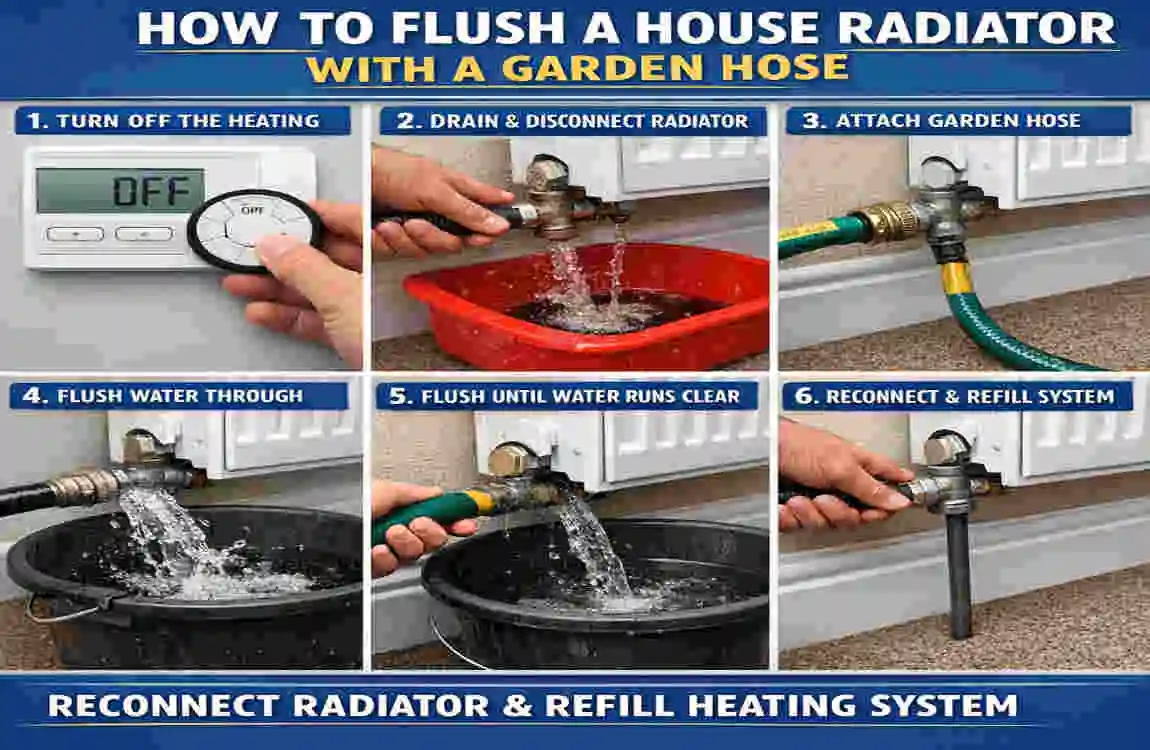
First, walk over to your main thermostat and completely turn off the heating system. Do not just turn it down; turn it completely off. Give your house at least an hour or two to cool. You want to ensure the metal on the radiator is completely cool to the touch before you proceed.
Next, you need to isolate the radiator from the rest of the heating system. Look at the bottom of your radiator. You will typically see two valves, one on each side. These are your isolation valves. One is the Thermostatic Radiator Valve (TRV), which you use to control the temperature, and the other is the lockshield valve.
Turn the TRV all the way clockwise to the “off” position (number 0). For the lock-shield valve, you will usually need to pull off the plastic cap and use an adjustable wrench to turn the metal spindle clockwise until it stops. Count how many turns it takes to close the lock-shield valve, and write that number down! You will need to turn it back exactly that same amount later to keep your system balanced.
With the radiator isolated, lay down your old towels directly underneath both valves. Place a shallow plastic tray (a paint roller tray works perfectly) under the valve you plan to disconnect first. Keep your large bucket right beside you. By properly preparing your house radiator for flushing, you guarantee a mess-free project.
Safely Remove the Radiator from the System
With the water flow completely blocked by the closed valves, you are ready to detach the radiator physically. This step requires some physical effort, so take your time and follow the mechanics closely.
Start by using your radiator bleed key to open the bleed valve at the top of the radiator. You will hear a slight hissing sound as the trapped air escapes. This releases the internal vacuum, allowing the water inside to drain out much faster when you undo the bottom nuts.
Next, take two wrenches. Place one wrench on the valve body to steady it. Place your second adjustable wrench on the large nut that connects the valve to the radiator itself. Always hold the valve steady! If you crank on the nut without supporting the valve, you could easily twist and snap the copper pipe coming out of your floor.
Gently loosen the nut. As soon as it comes loose, water will begin to weep out. Let this water drip into your shallow tray. Once the tray is full, tighten the nut, empty the tray into your large bucket, and repeat. Once the water stops flowing, you can unscrew the nut completely. Move over to the other side of the radiator and repeat this exact process.
Once both sides are completely disconnected, you need to remove the radiator from the wall physically. If your radiator is bolted to the wall, look behind it to see how it sits on the mounting brackets. Usually, you can lift it straight up and off the hooks. Warning: Radiators are surprisingly heavy, especially if there is still some water trapped inside. You should always grab a partner to help you lift it safely.
Carry the radiator outside to your driveway or patio. You are now finished disconnecting the radiator before you flush it with a garden hose!
Connect the Garden Hose to the Radiator
Now that your dirty radiator is sitting safely outside, the real magic begins. You need to set up your flushing station. Find a spot in your yard where the dirty water can drain safely, like an exterior street drain or a gravel patch. Avoid draining the sludge directly onto your prize-winning lawn, as the metallic rust can harm delicate plants.
Grab your garden hose. You are going to connect one end of the hose to an outdoor water spigot, and the other end directly to the radiator inlet. Depending on your radiator’s design, you can press the open end of the hose tightly against the pipe connection.
However, for a truly professional setup, you should use a hose adapter. You can pick up a cheap universal rubber adapter at any hardware store. This slips over the radiator inlet and clamps onto your garden hose, creating a watertight seal. This prevents water from spraying back into your face when you turn on the pressure.
Position the other end of the radiator (the outlet) so it points down toward your drain or a large bucket. Make sure your garden hose is neatly stretched out. Take a quick walk along the length of the hose to check its condition. You want to avoid any hard kinks or bends that could restrict the water pressure.
Remember, it is the pressurized water from the hose that does all the heavy lifting here. The pressure actively forces the stubborn sludge to break apart and exit the system. By taking a few extra minutes to perfect the flush of a house radiator with a garden hose setup, you will achieve much better results.
Actually Flush the House Radiator with the Garden Hose
It is time for the main event. Walk over to your outdoor water spigot and turn the tap on very slowly. Do not blast it at full volume right away. You want to introduce the water gently to ensure your hose connections hold tight and do not leak.
As the water begins to flow into the radiator, keep a close eye on the water exiting the other side. The water might look relatively clear at first. But within a few seconds, the pressure will reach the bottom of the radiator where the sludge lives. Suddenly, the water pouring out will turn dark brown, black, or even completely opaque like thick mud.
This is the sludge that has been ruining your heating efficiency. Let the water run continuously. To help the process along, you should occasionally tip the radiator slightly from side to side (if it is safe for you to do so). Sloshing the water around internally helps dislodge the sticky rust clinging to the inside walls.
If you suspect you have incredibly stubborn sludge, grab a rubber mallet. Gently tap the bottom and sides of the metal radiator while the water is flowing. The gentle vibrations will knock loose hardened scale that the water pressure alone cannot move. Be careful not to use a metal hammer, as this will chip your paint and dent the metal.
After a few minutes, you will notice the exiting water start to clear. But you are not done yet! Turn off the hose and disconnect it. Now, attach the garden hose to the opposite side of the radiator. Flushing in both directions (through the inlet and then back through the outlet) is crucial. It creates reverse pressure that catches debris hiding behind internal baffles.
Keep flushing the water back and forth until the water exiting the unit runs absolutely crystal clear. It requires patience, and you might need to do multiple flushes, but the results are entirely worth it. If anyone ever asks you how to flush a house radiator with a garden hose, tell them the secret is all in the reverse flush!
Check, Reconnect, and Reinstall the Radiator
Congratulations, the inside of your radiator is now sparkling clean. Turn off your garden hose, disconnect all the adapters, and tip the radiator back and forth one last time to drain out any remaining clear water.
Before you carry it back inside, take a moment to inspect the radiator. Look closely at the connection threads for any remaining debris, stray Teflon tape, or signs of damage. Wipe the threads completely clean with an old rag.
Grab your lifting partner and carefully carry the unit back to its original location in your house. Lift it up and gently hook it back onto the wall brackets or bracket bolts. Ensure it is sitting level and feels securely attached to the wall.
Next, align the radiator inlets with your pipe valves. Hand-tighten the nuts first to ensure you do not cross-thread them. Once they are hand-tight, use your two wrenches again to tighten the joints securely. Remember to support the valve with one wrench while you tighten the nut with the other!
Once everything is securely connected, you can restore the central heating system. Start by opening the TRV valve completely. Then, open your lock-shield valve by turning it counter-clockwise the exact number of turns you wrote down earlier.
As the radiator begins to fill with water from the system, you will hear a rushing sound. Grab your radiator bleed key. Open the bleed valve at the top of the radiator to let all the air escape. Once a steady stream of water is issuing from the bleed valve, close it tightly.
Turn your central heating system back on at the thermostat. As the house heats up, thoroughly check the valves and nuts for any microscopic leaks. Wipe them with dry tissue paper—if the paper stays dry, your seals are perfect! You have now completed the entire process for what to do after flushing a house radiator with a garden hose.
Pro Tips for a More Effective Radiator Flush
If you want to elevate your DIY skills to a professional level, there are a few expert tricks you can utilize during this process.
First, if you find a significant amount of sludge in a single radiator, you should strongly consider flushing multiple units. Usually, if one radiator is heavily blocked, the others in the house are suffering from the same issue. Make it a weekend project and flush the entire ground floor.
Second, consider using a radiator sludge cleaner or chemical flush additive. You can pour a liquid chemical cleaner into your system a few days before you plan to do your manual flush. The chemicals break down the hardened rust, making your garden hose flush ten times more effectively. Just ensure you read the chemical safety precautions carefully.
Third, timing is everything. Try to time your major flushing projects during the warmer spring or summer months. It is much less stressful to turn off your heating system when you do not actually rely on the heating to keep your family warm.
Finally, keep a maintenance log. Write down the date you flushed each specific radiator and tape it to the side of your boiler. Proper home heating system maintenance relies on consistency. Tracking your preventive radiator care will ensure your home stays efficient for decades.
When You Should Call a Plumber Instead
While flushing your own radiators is a fantastic way to save money, it is vital to recognize your own limits. DIY is fine for basic maintenance, but safety and system complexity truly matter. There are several scenarios where calling a professional plumber is the smartest move.
If you notice persistent leaks around your valves, severe green corrosion on your copper pipes, or damaged valve spindles that will not turn, stop immediately. Applying force to compromised plumbing will result in a flooded living room. A plumber has specialized tools to freeze pipes and replace broken valves safely.
You should also defer to a professional if you live in a home with an old or complex central heating system that is incredibly hard to isolate. Some vintage systems do not use standard TRVs or lock-shield valves, making it impossible to remove a radiator without draining the entire house’s plumbing.
Furthermore, if you are unsure how to properly shut off the boiler or locate your main water supply, it is better to call for backup. A qualified heating engineer can also perform a full system power flush. This is a heavy-duty mechanical process that pumps powerful chemicals through your entire house at high velocity, clearing out sludge that a garden hose cannot reach.
FAQs About Flushing a House Radiator with a Garden Hose
To make sure you have absolutely all the information you need, let’s address some of the most common questions homeowners ask about this process.
Q: How often should I flush my house radiator?
A: Generally, you should aim to flush your radiators every 5 to 6 years. However, if you notice cold spots returning or your boiler becoming noisy, you may need to perform this maintenance more frequently.
Q: Can I flush radiators without removing them?
A: Technically, yes, by using chemical additives and draining the system via a central drain valve. However, to truly blast out heavy sludge, manually taking them outside is the most effective method.
Q: Is it safe to flush a radiator with cold water from a garden hose?
A: Yes, it is completely safe. The cold water will not damage the radiator’s metal, and the sudden temperature difference actually helps the hardened sludge contract and break away from the internal walls.
Q: What color should the flushed water be?
A: When you first start, the water will likely be dark brown or pitch black. You must continue the flushing process until the water exiting the unit runs clear and transparent.
Q: Can I use a garden hose to flush more than one radiator?
A: Absolutely. Once you master how to flush a house radiator with a garden hose, you can quickly disconnect and flush every single radiator in your home using the same hose setup.
Q: What should I do if water stops flowing during the flush?
A: If the water suddenly stops, a large chunk of scale has likely blocked the outlet. Turn off the hose pressure, gently tap the blockage area with a rubber mallet, and try flushing from the reverse direction to dislodge it.