
Garden sleepers are a vital component in many landscaping projects, providing both functionality and aesthetic appeal. Whether you’re using them to create raised garden beds, retaining walls, or decorative edging, securing them properly is key to ensuring safety, durability, and long-term success.
Garden sleepers, often made of wood, concrete, or composite materials, are incredibly versatile in home gardens. They can be used to build raised garden beds, define pathways, create retaining walls, or even form rustic-looking steps. These sleepers add a natural, timeless charm to any garden design while serving practical purposes.
However, properly securing garden sleepers is crucial. Without adequate securing techniques, sleepers may shift, rot, or even collapse over time, resulting in safety hazards, structural instability, or wasted investment. By ensuring your garden sleepers are installed correctly, you’ll not only extend their lifespan but also enhance the overall aesthetics and functionality of your outdoor space.
Understanding Garden Sleepers and Their Uses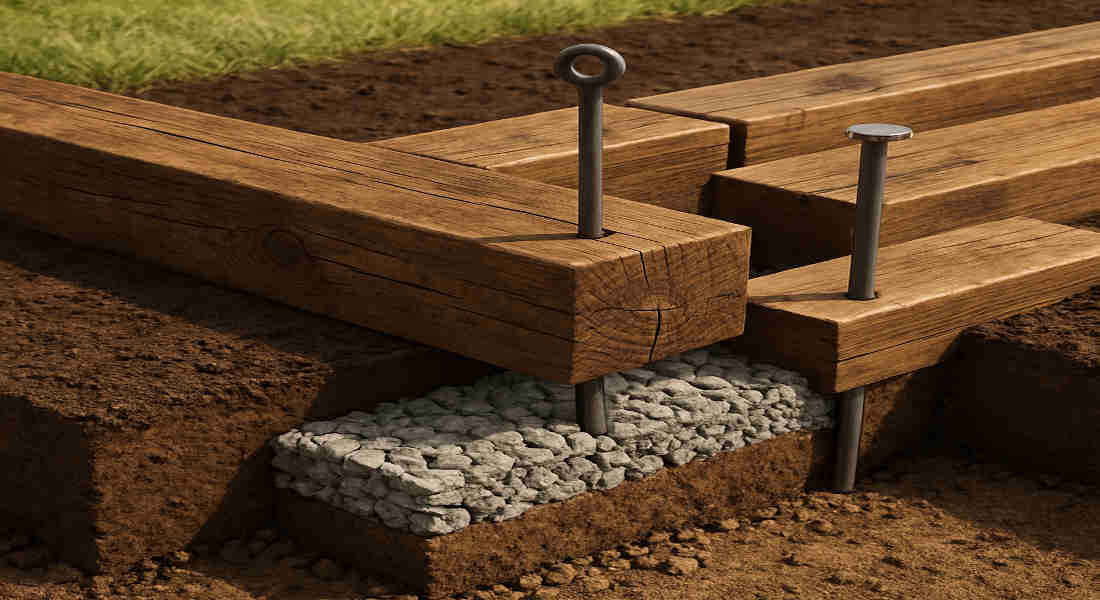
What Are Garden Sleepers?
Garden sleepers are large, rectangular beams traditionally made from timber but also available in concrete and composite materials. Initially used as railway ties, these sleepers have gained popularity in landscaping due to their rustic appearance and strength.
Types of Garden Sleepers
There are three main types of garden sleepers:
- Wooden Sleepers: These are the most common and versatile. They can be treated or untreated, with pressure-treated sleepers offering better resistance to rot and insects.
- Concrete Sleepers: Renowned for their durability and weather resistance, concrete sleepers are ideal for heavy-duty projects, such as retaining walls.
- Composite Sleepers: Made from recycled materials, these are eco-friendly and resistant to rot, making them low-maintenance.
Common Uses for Garden Sleepers
Here are some popular ways garden sleepers are used in landscaping:
- Raised Garden Beds: Perfect for growing vegetables, flowers, or herbs.
- Retaining Walls: Help to level sloped areas or prevent soil erosion.
- Pathways and Edging: Define garden walkways or add structure to flowerbeds.
- Steps and Borders: Enhance the accessibility and layout of your garden.
Why Securing Sleepers Is Important
Securing garden sleepers is essential for several reasons:
- Structural Stability: Properly anchored sleepers won’t shift or collapse.
- Durability: Securely installed sleepers last longer, even under heavy loads or harsh weather conditions.
- Safety: Prevent accidents caused by loose or unstable sleepers.
- Aesthetic Appeal: Well-placed sleepers maintain their alignment and look neat over time.
Key Methods to Secure Garden Sleepers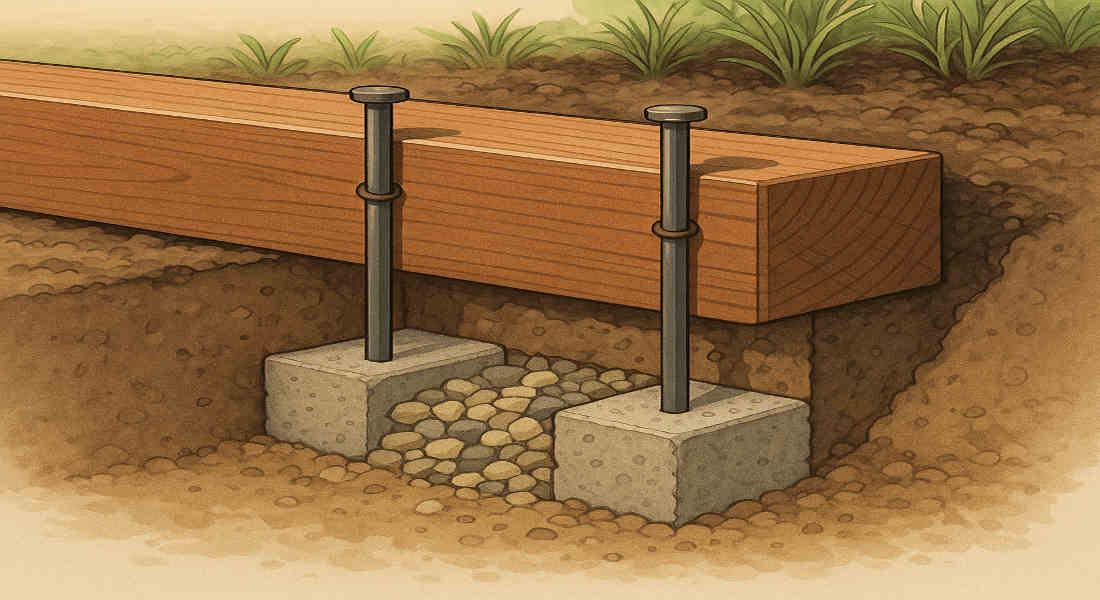
When it comes to securing house garden sleepers, there are several effective techniques you can use depending on your project. Below, we’ll explore these methods in detail.
Using Wooden Stakes and Metal Rods
One of the simplest and most common methods is using wooden stakes or metal rods to anchor the sleepers in place.
- How It Works:
- Wooden stakes are driven into the ground and attached to the sleeper for stability. Alternatively, metal rods can be inserted through pre-drilled holes in the sleeper and hammered into the soil beneath.
- Depth Recommendations:
- Stakes or rods should extend at least 60% of their length into the soil for a firm hold. For example, if the sleeper is 100mm thick, the stake should be at least 600mm long.
- Additional Stability:
- To increase durability, you can set the stakes or rods in concrete. Pour concrete around the base of the stakes to hold them firmly in place.
Fixing Sleepers Together Using Sleeper Secure Fixings
The SleeperSecure system is a modern solution for fixing sleepers together. It involves using support spikes, plates, and anchor brackets to create a strong, interconnected structure.
- Step-by-Step Process:
- Position the Sleepers: Arrange the sleepers in your desired layout.
- Drive Support Spikes: Hammer the spikes into the ground where the sleepers meet.
- Secure with Screws: Use screws and brackets to fasten the sleepers together.
- Benefits:
- Prevents movement or shifting.
- It creates a durable, long-lasting structure.
- It is ideal for retaining walls and raised beds.
Building Trenches and Using Concrete Bases
For projects requiring maximum stability, such as retaining walls, you can build trenches and use concrete bases to secure your sleepers.
- How It’s Done:
- Dig a trench where the sleeper will be placed.
- Pour scalpings (crushed stone) or concrete into the trench to create a solid base.
- Place the sleeper on top and secure it with stakes or screws.
- Advantages:
- It prevents sleepers from shifting over time.
- It provides excellent Drainage, reducing the risk of rot.
Using Landscaping Poles and Bollards
Another effective method involves using landscaping poles or bollards as vertical supports.
- Installation Tips:
- Poles should be driven 300mm to 600mm deep into the ground.
- Fix the sleeper to the pole using screws or brackets.
- Add concrete at the base of the poles for extra strength.
Preventing Rot and Extending the Life of Garden Sleepers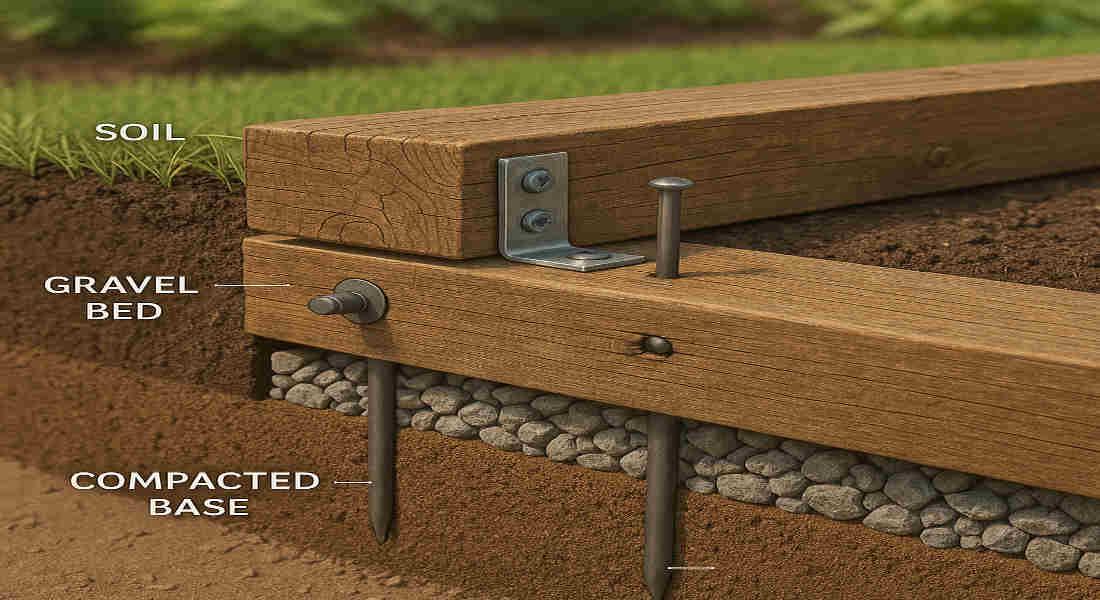
Rot is one of the biggest challenges with wooden garden sleepers. Follow these tips to ensure your sleepers last as long as possible.
Choosing Pressure-Treated Sleepers
Pressure-treated sleepers are infused with preservatives to resist rot, fungi, and insect damage. While they cost slightly more, they’re worth the investment for their longevity.
You may also read (how to keep bees in your house garden in the uk).
Applying Additional Wood Preservatives
Even if your sleepers are treated, applying an additional wood preservative can provide extra protection. Reapply the preservative every 2-3 years for best results.
Installing Moisture Barriers and Ensuring Drainage
To prevent moisture buildup:
- Place plastic sheeting or gravel beds under the sleepers.
- Use drainage pipes to direct water away from the sleepers.
- Avoid placing sleepers directly on the soil.
Elevating Sleepers Off the Ground
Use concrete supports or steel brackets to raise sleepers slightly off the ground, reducing their exposure to soil moisture and extending their lifespan.
Step-by-Step Guide to Secure Your House Garden Sleepers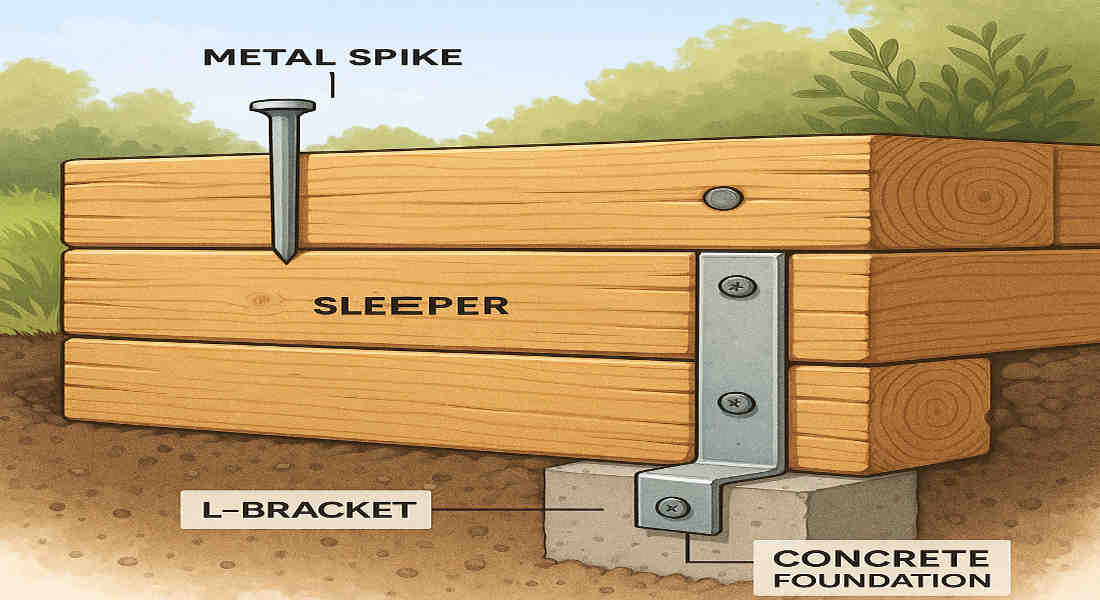
Here’s a quick guide to help you secure your garden sleepers like a pro:
- Plan Your Layout: Measure the area and mark the sleeper positions with string and pegs.
- Prepare the Ground: Dig trenches or holes as needed, ensuring the surface is level and even.
- Choose a Securing Method: Select the method that best suits your project (stakes, fixings, or concrete).
- Install the Sleepers: Place the sleepers in position and secure them using your chosen method.
- Finish With Preservatives: Apply wood preservatives and ensure proper Drainage to prevent rot.
Tools and Materials Needed
Here’s a quick list of what you’ll need: Tools | Materials Mallet Pressure-treated sleepers Drill Wood preservative Screws Sleeper Secure fixings Shovel Concrete mix or scalpings Measuring tape Gravel or drainage pipes
Common Mistakes to Avoid
- Shallow Anchoring: Ensure stakes or rods are driven deep enough.
- Ignoring Drainage: Poor Drainage leads to rot and instability.
- Using Untreated Wood: Always opt for pressure-treated sleepers.
- Skipping Maintenance: Regularly inspect and preserve your sleepers.
Additional Tips for Maintaining Your Garden Sleepers
- Inspect sleepers annually for signs of movement or rot.
- Reapply wood preservatives every few years.
- Clear debris and ensure drainage paths remain unobstructed.
- Perform seasonal maintenance to keep your sleepers in top condition.
You may also read (what is the best route t home kew garden).