
When it comes to achieving a durable, weatherproof roof, correctly overlapping metal roofing panels is one of the most crucial steps. Whether you’re a homeowner tackling a DIY project or a contractor seeking to perfect your craft, understanding the nuances of panel overlap ensures a roof that stands the test of time—against storms, temperature changes, and moisture intrusion.
Why Proper Panel Overlapping Matters

The Foundation of Weatherproofing
Metal roofs are renowned for their durability and longevity, but without proper panel overlapping, even the best materials can fail. Overlaps create a seamless barrier that channels water away from your home, preventing leaks and structural damage.
Energy Efficiency and Cost Benefits
Correctly installed overlaps also improve energy efficiency, reflecting heat away from the roof and reducing cooling costs. Plus, a properly weatherproof roof minimizes costly repairs down the line.
What You’ll Learn
By the end of this article, you’ll have a comprehensive understanding of:
- The role of overlaps in metal roofing.
- Step-by-step instructions for overlapping panels.
- Tools, materials, and essentials for preparation.
- Common pitfalls and maintenance tips.
Understanding Metal Roofing Panel Overlap
What Is Overlap in Metal Roofing?
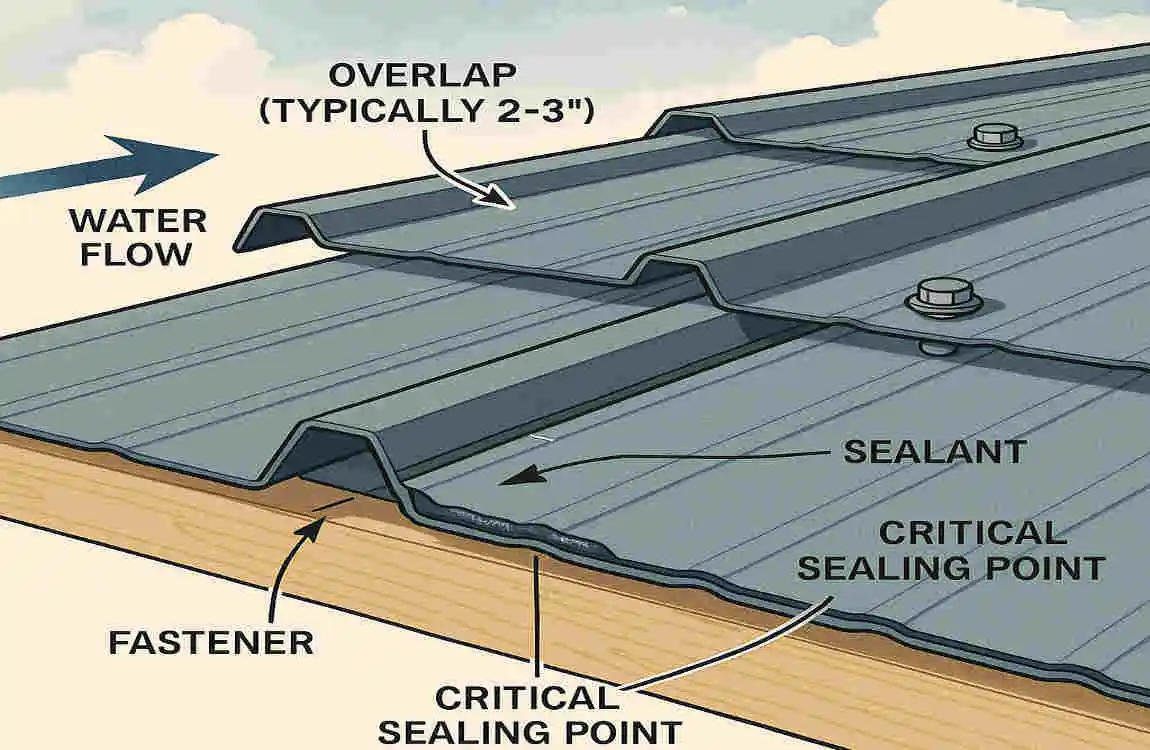
In metal roofing, overlapping refers to aligning panels so their edges overlap, creating a water-resistant seal. This overlap ensures that rainwater flows seamlessly down the roof without seeping between panels.
Key Terms to Know
Here are some critical terms to familiarize yourself with:
- Laps and Seams: Where two panels overlap or meet.
- Fasteners: Screws or rivets that secure panels to the roof structure.
- Underlayment: A waterproof layer installed beneath metal panels.
- Gables, Ridges, Hips, and Valleys: Roof edge and slope features that require special attention during panel installation.
Panel Profiles and Their Overlap Requirements
Different types of metal panels require unique overlap techniques:
- Standing Seam Panels: These have concealed fasteners and require precise alignment for clean seams.
- Exposed-Fastener Panels: Overlap is more visible, and screws play a significant role in water resistance.
- Concealed-Fastener Panels: These rely on interlocking edges for a seamless look.
Climate and Roof Orientation
The climate and direction of your roof slopes directly affect how you overlap panels. For example:
- Areas with heavy rainfall need tighter overlaps and sealants.
- High-wind zones require more fasteners and specific overlap techniques to resist uplift.
Planning Your Overlap Strategy
Assessing Your Roof Structure
Before starting, evaluate the roof’s components:
- Decking: Ensure the substrate is stable and moisture-free.
- Underlayment: Check compatibility with your panel type.
- Insulation: Ensure it doesn’t obstruct panel installation.
Choosing the Right Panels
Pick panels suited to your climate and roof pitch:
- Low-Pitched Roofs: Require additional sealants and tighter overlaps.
- High-Pitched Roofs: Allow for easier water runoff, reducing the risk of overlap.
Calculating Overlap Requirements
To calculate overlaps:
- Measure panel lengths and widths.
- Add at least 6-12 inches for vertical overlaps.
- Ensure horizontal overlaps align with structural support points.
Fasteners and Sealants
- Use corrosion-resistant screws with neoprene washers.
- Apply sealants compatible with metal roofing, such as butyl tape or silicone caulk.
Building Codes and Manuals
Always consult:
- Local building codes to meet safety standards.
- Manufacturer guidelines for overlap spacing, fastener placement, and warranties.
Tools, Materials, and Preparation
Essential Tools Checklist
Before you start, gather these tools:
- Measuring tape and chalk line.
- Tin snips or metal shears.
- Power drill and sealant gun.
- Rivets, seam clamps, and safety equipment (fall protection).
Materials You’ll Need
Prepare the following materials:
- Metal panels and fasteners.
- Closure strips and sealants.
- Underlayment, flashing, and corner trims.
Safety First
- Wear PPE (gloves, goggles, and non-slip footwear).
- Plan for clear weather conditions—avoid working in rain or high winds.
Preparing Your Roof
- Clean the roof surface and remove debris.
- Inspect for damage or uneven areas.
Step-by-Step Guide: Overlapping Metal Roofing Panels
Pre-Installation Checks
- Ensure panels are straight and aligned.
- Verify the orientation of panels (upward ridges face the prevailing wind).
Laying the Starter Panel
- Begin at the edge of the roof.
- Align the starter panel with a chalk line for precision.
Creating the Overlap
- Overlap each panel by at least 6 inches vertically.
- For horizontal overlaps, ensure ridges align perfectly.
Fastening Panels
- Use screws with washers, spaced every 12-18 inches along the overlap.
- Avoid over-tightening, which can warp panels.
Sealing Seams
- Apply sealant along overlaps for extra water resistance.
- Use closure strips to fill gaps at edges and ridges.
Special Areas (Hips, Ridges, Valleys)
- Install flashing to direct water away from these areas.
- Overlap flashing pieces by at least 3 inches.
Final Quality Check
- Inspect for gaps, loose fasteners, or uneven overlaps.
- Perform a water test by spraying the roof with a hose.
Weatherproofing and Performance Considerations
Reducing Water Ingress
Proper overlaps prevent leaks by efficiently channeling water away.
Ventilation and Condensation Control
Install vents or breathable underlayment to minimize condensation buildup under panels.
Common Overlap Issues
- Fish mouths: Gaps caused by uneven fastener placement.
- Loosening Screws: Ensure screws are tight but not overdriven.
Maintenance, Repairs, and Long-Term Care
Routine Inspections
Inspect your roof house twice a year and after major storms. Look for:
- Loose fasteners or damaged overlaps.
- Sealant wear or corrosion.
Minor Repairs
- Reseal seams with compatible products.
- Replace damaged panels promptly.
Cleaning Tips
- Use soft brushes and mild soap to clean panels.
- Avoid abrasive cleaners that damage protective coatings.