
When it comes to your home, the roof is one of the most critical components. It’s your first line of defense against the elements, and a properly installed roof can make all the difference in keeping your home safe and dry. But did you know that the size of the nails you use for your roof sheathing can play a significant role in the overall stability and longevity of your roof?
Understanding 7/16 OSB Roof Sheathing
What is OSB and its Properties?
Oriented Strand Board (OSB) is a type of engineered wood product that is made by compressing and bonding together strands of wood with adhesives. OSB is known for its strength, durability, and cost-effectiveness, making it a popular choice for a wide range of construction applications, including roof sheathing.
OSB has several key properties that make it an excellent choice for roof sheathing:
- Strength and Stiffness: OSB’s unique manufacturing process produces a panel that is both strong and stiff, capable of withstanding heavy loads and resisting deflection.
- Moisture Resistance: OSB is treated with water-resistant adhesives and coatings, making it more moisture-resistant than traditional plywood.
- Dimensional Stability: OSB has excellent dimensional stability, meaning it is less likely to expand or contract with changes in humidity or temperature.
Why 7/16-inch Thickness is Commonly Used for Roof Sheathing
The 7/16-inch thickness is a common choice for OSB roof sheathing due to its optimal balance of strength, weight, and cost. This thickness provides sufficient structural integrity to support roofing materials while keeping the overall weight of the roof system manageable.
Additionally, 7/16-inch OSB meets most building code requirements for roof sheathing in residential construction. It is strong enough to withstand wind uplift forces and can be easily installed using standard nailing patterns.
Advantages of 7/16 OSB in Roofing Systems Over Other Materials
Compared to other roofing materials like plywood, 7/16 OSB offers several advantages:
- Cost-Effectiveness: OSB is generally less expensive than plywood, making it a more budget-friendly option for homeowners.
- Consistency: OSB is manufactured in a controlled environment, resulting in consistent quality and performance across panels.
- Strength-to-Weight Ratio: 7/16 OSB offers an excellent strength-to-weight ratio, enabling a strong, lightweight roof system.
Typical Roofing Applications Using 7/16 OSB
7/16 OSB roof sheathing is commonly used in various roofing applications, including:
- Residential Roofing: 7/16 OSB is a popular sheathing material for residential roofs, providing a strong, stable base for asphalt shingles, metal roofing, and other roofing materials.
- Commercial Roofing: In some commercial applications, 7/16 OSB may be used as roof decking, particularly in low-slope or flat roofing systems.
- Re-roofing Projects: When re-roofing an existing structure, 7/16 OSB can be used to replace damaged or deteriorated roof sheathing, providing a fresh start for the new roofing system.
Now that we have a better understanding of 7/16 OSB roof sheathing and its properties, let’s explore why nail size matters in securing your roof.
Why Nail Size Matters in Roof Sheathing
Role of Nails in Securing OSB Panels on Roof Frames
Nails play a crucial role in securing OSB roof sheathing panels to the roof frame. They act as the primary fasteners, holding the sheathing in place and transferring loads from the roof to the underlying structure.
The right nail size ensures that the sheathing is fastened correctly and can withstand various forces, such as wind uplift, snow loads, and the weight of the roofing materials. Using the correct nail size helps create a strong and stable roof system that can protect your home for years to come.
Effects of Using Incorrect Nail Size (Too Small or Too Large)
Using the wrong nail size can have significant consequences for your roof’s performance and longevity. If the nails are too small, they may not provide sufficient holding power, leading to loose or detached sheathing panels. This can result in leaks, structural damage, and even roof failure during severe weather events.
On the other hand, if the nails are too large, they can split the OSB panels, compromising their structural integrity. Oversized nails can also create gaps between the sheathing and the roof frame, reducing the roof system’s overall stability.
How Nail Size Impacts Roof Durability and Resistance to Weather
The right nail size is essential for ensuring your roof’s durability and resistance to various weather conditions. Appropriately sized nails help keep the sheathing securely fastened, preventing uplift and movement during high winds.
Additionally, the correct nail size helps maintain the roof’s structural integrity, allowing it to better withstand the weight of snow and ice. Using the appropriate nail size can help extend the life of your roof and protect your home from the elements.
Building Code Requirements Related to Nail Size for OSB Sheathing
Building codes and regulations often specify minimum nail size requirements for OSB roof sheathing to ensure the structural integrity and safety of the roof system. These codes may vary depending on your location and the specific roofing application.
It’s essential to consult local building codes and manufacturer guidelines to determine the appropriate nail size for your 7/16 OSB roof sheathing. By following these requirements, you can help ensure your roof meets the required safety and performance standards.
Now that we understand the importance of nail size in roof sheathing, let’s dive into the specific nail sizes recommended for 7/16 OSB roof sheathing.
What Size Nails for 7/16 OSB Roof Sheathing
Industry Standards and Recommendations for Nail Size with 7/16 OSB
When it comes to nailing 7/16 OSB roof sheathing, industry standards and recommendations provide valuable guidance on the appropriate nail size. The most commonly recommended nail size for 7/16 OSB is the 8d common nail.
The 8d common nail is 2.5 inches long and has a gauge of 10.5. This size strikes a perfect balance between providing sufficient holding power and minimizing the risk of splitting the OSB panels.
Typical Nail Sizes (Length, Gauge, Type) Used with This Sheathing Thickness
While the 8d common nail is the most recommended size, other nail sizes may also be suitable for 7/16 OSB roof sheathing, depending on specific project requirements and local building codes. Here are some typical nail sizes used with this sheathing thickness:
- 6d common nail: 2 inches long, 12.5 gauge
- 8d common nail: 2.5 inches long, 10.5 gauge
- 10d common nail: 3 inches long, 9 gauge
Nail Types Suitable for Roofing: Common Nails, Ring Shank Nails, etc.
When selecting nails for your 7/16 OSB roof sheathing, you’ll encounter various nail types, each with its own unique features and benefits. Here are some common nail types suitable for roofing:
- Common nails: These are the most widely used nails for roofing applications. They have a smooth shank and a large, flat head that provides excellent holding power.
- Ring shank nails: These nails have a shank with circular rings that create additional friction and resistance when driven into the wood. Ring shank nails offer superior holding power compared to common nails.
- Screw shank nails: These nails have a spiral-threaded shank that provides even greater holding power than ring shank nails. However, they may be more challenging to drive and remove.
Comparison of Nail Sizes: 6d, 8d, 10d – Which is Ideal and Why
Now, let’s compare the three most common nail sizes used for 7/16 OSB roof sheathing and determine which one is ideal:
- 6d common nail: While the 6d nail is shorter than the recommended 8d nail, it may still be suitable for some applications, especially in regions with lower wind uplift requirements. However, its shorter length may compromise holding power in high-wind areas.
- 8d common nail: As mentioned earlier, the 8d common nail is the most recommended size for 7/16 OSB roof sheathing. Its 2.5-inch length provides sufficient penetration into the roof frame while minimizing the risk of splitting OSB panels.
- 10d common nail: The 10d nail is longer than the recommended 8d nail and may be suitable for applications requiring additional holding power. However, its larger size increases the risk of splitting the OSB panels, so it should be used with caution.
Based on industry standards and recommendations, the 8d common nail is the ideal choice for 7/16 OSB roof sheathing due to its optimal balance of holding power and minimal risk of splitting the panels.
Importance of Nail Length to Penetrate Through OSB and into Rafters or Trusses
The length of the nail is crucial to ensuring it penetrates the 7/16-inch OSB sheathing and into the underlying rafters or trusses. This penetration is essential for creating a secure connection between the sheathing and the roof frame.
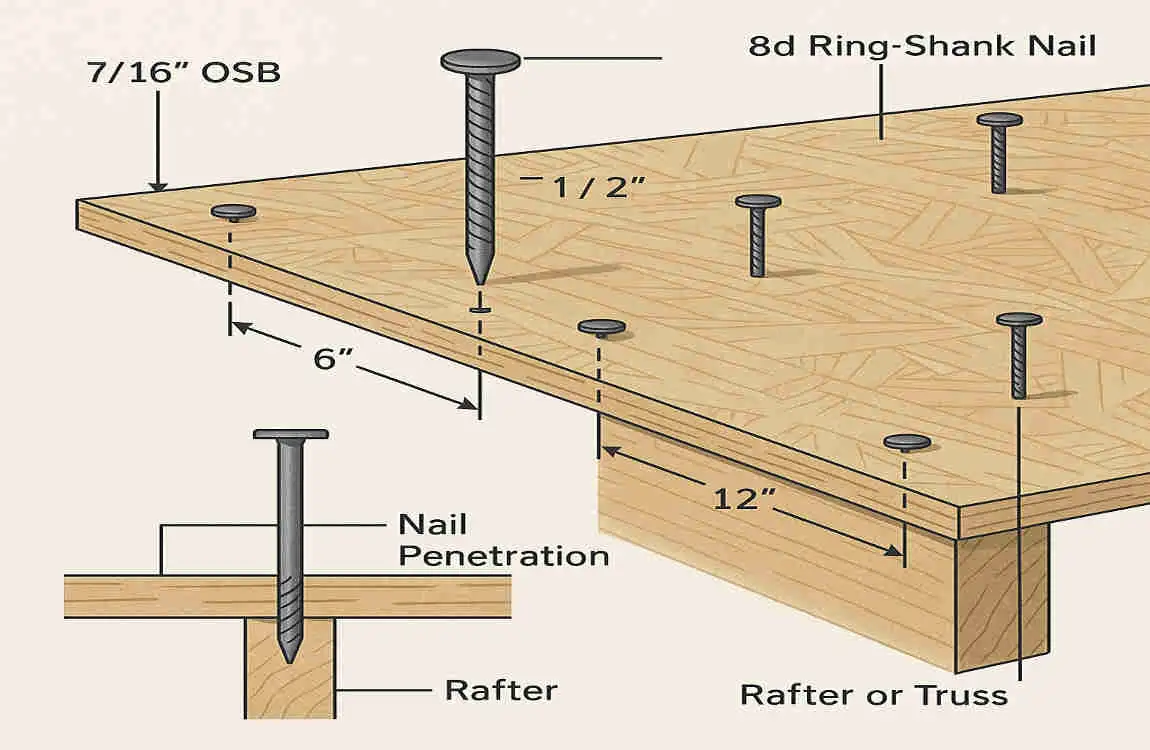
The 8d common nail’s 2.5-inch length allows for approximately 1.75 inches of penetration into the roof frame, which is sufficient for most roofing applications. This penetration depth helps distribute loads evenly and prevents the sheathing from lifting or detaching during high winds or other forces.
How Nail Size Choice Impacts Holding Power and Long-Term Roof Performance
The nail size you choose for your 7/16 OSB roof sheathing directly impacts the holding power and long-term performance of your roof. Using the recommended 8d standard nail size ensures that the sheathing is securely fastened to the roof frame, providing excellent holding power and resistance to uplift forces.
Appropriately sized nails help maintain the structural integrity of the roof system, allowing it to withstand various weather conditions and extend its lifespan. By choosing the right nail size, you can help ensure that your roof remains secure and performs well for years to come.
Now that we’ve covered the essential aspects of nail size for 7/16 OSB roof sheathing, let’s explore some additional considerations when selecting nails for your roofing project.
Additional Nail Considerations for OSB Roof Sheathing
Nail Spacing Requirements for Different Roof Types and Pitch
In addition to nail size, proper nail spacing is crucial for ensuring the stability and performance of your 7/16 OSB roof sheathing. Nail spacing requirements may vary depending on the roof type and pitch.
For most residential roofs with a pitch of 4:12 or greater, a typical nailing pattern is to space nails 6 inches on center along the edges of the sheathing panels and 12 inches on center in the field. However, it’s essential to consult local building codes and manufacturer guidelines for specific nailing pattern recommendations based on your roof type and pitch.
Corrosion Resistance: Galvanized vs Stainless Steel Nails
When selecting nails for your 7/16 OSB roof sheathing, consider corrosion resistance, especially if your home is in a coastal or high-humidity area.
Galvanized nails are coated with a layer of zinc, which provides a moderate level of corrosion resistance. They are a cost-effective option for most roofing applications and can withstand normal weathering conditions.
Stainless steel nails, on the other hand, offer superior corrosion resistance and are ideal for use in harsh environments or when a longer lifespan is desired. While they are more expensive than galvanized nails, stainless steel nails can provide peace of mind and extended durability for your roof.
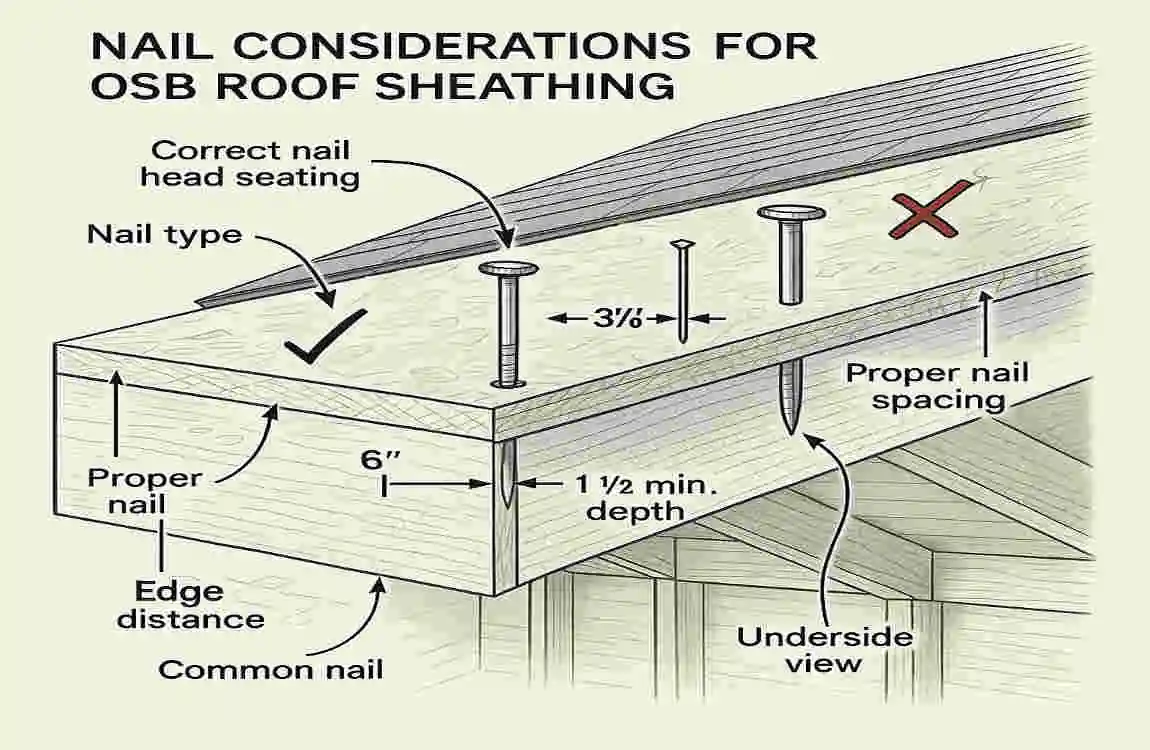
Roofing Nail Heads: Size and Design for Better Holding
The size and design of the nail head can also impact the holding power and overall performance of your 7/16 OSB roof sheathing. Larger nail heads provide a greater surface area for gripping the sheathing, resulting in improved holding power.
Some roofing nails feature specialized head designs, such as a checkered or ribbed pattern, which can enhance the grip on the OSB surface. These designs help prevent the nails from backing out over time and can contribute to a more secure roof system.
Impact of Nail Gun Usage on Nail Choice and Installation Quality
If you plan to use a nail gun to install your 7/16 OSB roof sheathing, it’s essential to consider how the nail gun affects your nail choice and installation quality.
Nail guns can drive nails more consistently and efficiently than manual hammering, but they may require specific nail types and sizes designed for use with the weapon. Be sure to select nails that are compatible with your nail gun and follow the manufacturer’s recommendations for optimal performance.
Additionally, nail guns can sometimes overdrive nails, causing them to penetrate too deeply into the OSB and potentially split the panels. To avoid this issue, adjust the nail gun’s depth setting and test it on a scrap piece of sheathing before beginning your installation.
Tips for Selecting Nails Based on Climate and Environmental Conditions
When choosing nails for your 7/16 OSB roof sheathing, consider your area’s climate and environmental conditions. These factors can influence the type of nails you select and the level of corrosion resistance required.
- High-humidity or coastal areas: Opt for stainless steel nails or hot-dipped galvanized nails with a thicker zinc coating to withstand the corrosive effects of moisture and salt air.
- High-wind or hurricane-prone regions: Consider using ring shank or screw shank nails for enhanced holding power and resistance to uplift forces.
- Extreme temperature fluctuations: Choose nails with a high-quality coating that withstands expansion and contraction, minimizing the risk of nail failure or withdrawal.
By considering these additional nail considerations, you can make informed decisions about the best nails for your 7/16 OSB roof sheathing project. In the next section, we’ll provide a step-by-step guide to installing your roof sheathing nails like a pro.
Step-by-Step Guide to Installing 7/16 OSB Roof Sheathing Nails
Preparation Before Nailing: Tools and Safety Gear
Before you begin nailing your 7/16 OSB roof sheathing, gather the necessary tools and safety gear. Here’s what you’ll need:
- Hammer or nail gun: Choose a hammer or a nail gun compatible with the nails you’ve selected for your project.
- Tape measure: Use it to ensure accurate spacing and alignment of your nails.
- Chalk line: A chalk line can help you mark straight lines for nailing along the edges and in the field of the sheathing panels.
- Safety glasses: Protect your eyes from flying debris and nail fragments by wearing safety glasses throughout the installation process.
- Work gloves: Wear work gloves to protect your hands and improve grip when handling nails and sheathing panels.
- Hard hat: If you’re working on a roof, a hard hat can provide additional protection from falling objects.
Positioning Nails Correctly According to Manufacturer and Code Specs
Once you’ve gathered your tools and safety gear, it’s time to start positioning your nails correctly. Follow these steps:
- Locate the rafters or trusses: Use a stud finder or tap on the sheathing to locate the underlying rafters or trusses. Mark their locations with a chalk line or pencil.
- Align the sheathing panels: Position the OSB panels perpendicular to the rafters or trusses, ensuring the edges are aligned and the panels are flush with each other.
- Nail along the edges: Start by nailing along the edges of the sheathing panels, following the recommended spacing (typically 6 inches on center). Drive the nails into the rafters or trusses, ensuring that they penetrate at least 1.75 inches into the wood.
- Nail in the field: After nailing the edges, move to the field of the sheathing panels and drive nails at the recommended spacing (typically 12 inches on center). Again, make sure the nails penetrate into the rafters or trusses.
Proper Nail Driving Techniques to Avoid Splitting OSB
To avoid splitting the 7/16 OSB sheathing panels, follow these proper nail driving techniques:
- Pre-drill if necessary: If you’re using larger nails or if the OSB is particularly dense, consider pre-drilling pilot holes to prevent splitting.
- Drive nails perpendicular: Always drive nails perpendicular to the sheathing surface to minimize the risk of splitting.
- Use the right hammer or nail gun setting: If using a hammer, choose one with a weight appropriate for the nail size. If using a nail gun, adjust the depth setting to avoid over-driving the nails.
- Drive nails slowly and steadily: Avoid hammering or driving nails too forcefully, as this can split the OSB. Instead, use a slow and steady motion to ensure the nails seat properly without causing damage.
Common Installation Mistakes to Avoid
To ensure a successful installation of your 7/16 OSB roof sheathing nails, be aware of these common mistakes and avoid them:
- Incorrect nail size: Using nails that are too small or too large can compromise the holding power and structural integrity of your roof. Always use the recommended nail size for your specific sheathing thickness.
- Improper nail spacing: Failing to follow the recommended spacing can create weak spots in the roof system. Adhere to the manufacturer’s and local building code requirements for proper nail spacing.
- Over-driving nails: Driving nails too deeply into the OSB can cause the panels to split or crack. Adjust your hammer or nail gun to avoid over-driving the nails.
- Neglecting safety precautions: Always wear the appropriate safety gear, including safety glasses, work gloves, and a hard hat if working on a roof. Follow proper ladder safety and fall protection guidelines to prevent accidents.
Inspection Tips Post-Installation for Secure Fastening
After installing your 7/16 OSB roof sheathing nails, take the time to inspect your work to ensure secure fastening.