
Building your dream home garage starts with a strong foundation—and nothing provides better durability and support than a properly laid concrete base. A solid concrete base is the backbone of your garage, ensuring its longevity and safeguarding against structural issues like cracks or water damage.
If you’ve ever wondered how to lay a concrete base for a home garage, you’re in the right place. Whether you’re a DIY enthusiast or hiring professionals, understanding the process is crucial to avoid costly mistakes and ensure a job well done.
Understanding the Importance of a Concrete Base for Your Garage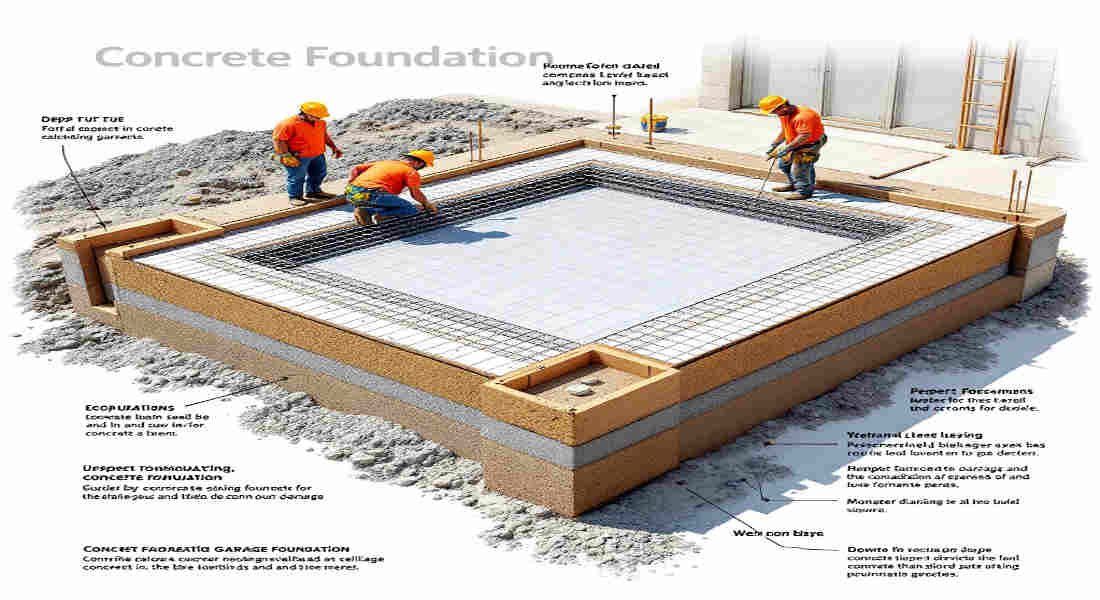
Structural Stability and Longevity
A properly laid concrete base serves as the foundation for your garage, supporting the structure’s weight and ensuring stability. Without it, your garage would be prone to shifting, cracking, and eventually collapsing. Concrete is strong, durable, and resistant to external forces like weather changes, making it the ideal material for heavy structures like garages.
Consequences of Poor Preparation
Improperly prepared bases can lead to several problems:
- Cracking: Uneven or poorly compacted soil beneath the concrete can lead to cracks over time.
- Shifting: Without proper reinforcement, the base may shift, causing structural misalignment.
- Water Damage: A poorly laid base can allow water to seep in, leading to erosion or damage to the garage floor.
Benefits of a Well-Laid Concrete Base
When done correctly, a concrete base:
- Ensures long-term durability.
- Prevents moisture and soil-related damage.
- Provides a level surface for construction and use.
- Adds value to your home by ensuring a professional finish.
Initial Planning and Design Considerations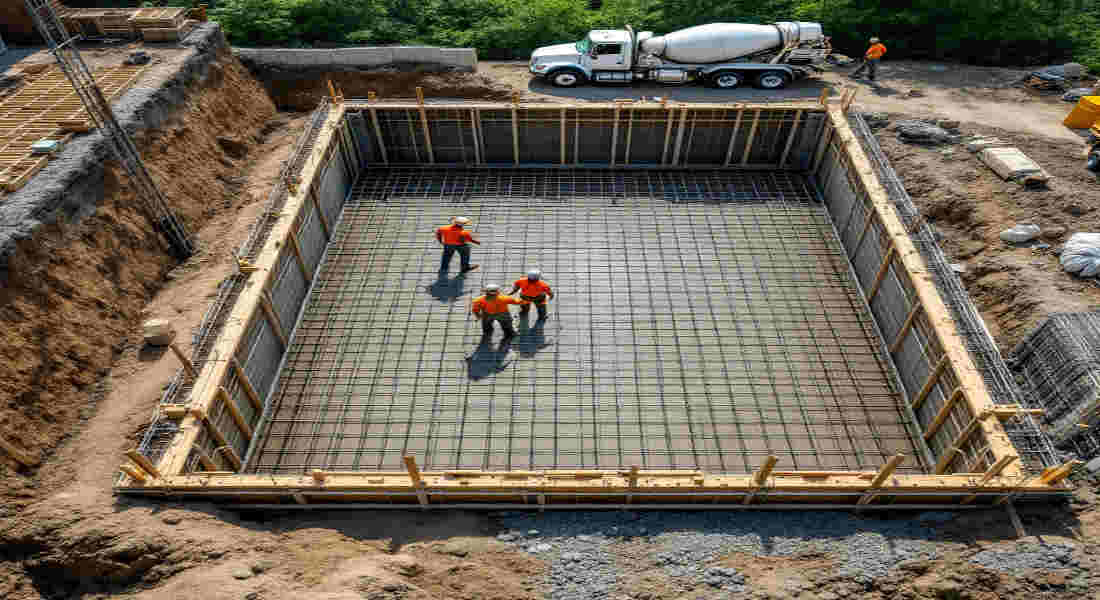
Before you start laying your concrete base, proper planning is essential. Here’s what you need to consider:
You may also read (home value the garage advantage).
Choosing the Right Location
- Drainage: Select an area with proper drainage to prevent water from pooling around or under the base.
- Soil Type: Stable soil, such as clay or gravel, is ideal for avoiding shifting or settling.
- Accessibility: Ensure the site is easily accessible for construction equipment and vehicles.
Determining Size and Thickness
The size and thickness of the concrete base depend on your garage’s purpose:
- For standard garages, a 4-6 inch thick concrete slab is ideal.
- For heavier loads (e.g., storing large vehicles), consider a thickness of 6-8 inches.
- Measure the Length and Width of your desired garage to calculate the base’s dimensions.
Building Codes and Regulations
Check your local building codes to ensure compliance with regulations. These codes will dictate factors such as:
- Minimum base thickness.
- Reinforcement requirements.
- Drainage and slope specifications.
Attached vs. Detached Garage Foundations
- Attached Garages: You may need additional considerations for integrating the base with your home’s foundation.
- Detached Garages: Offer more flexibility but still require proper drainage and stability.
Materials and Tools Needed for Laying a Concrete Base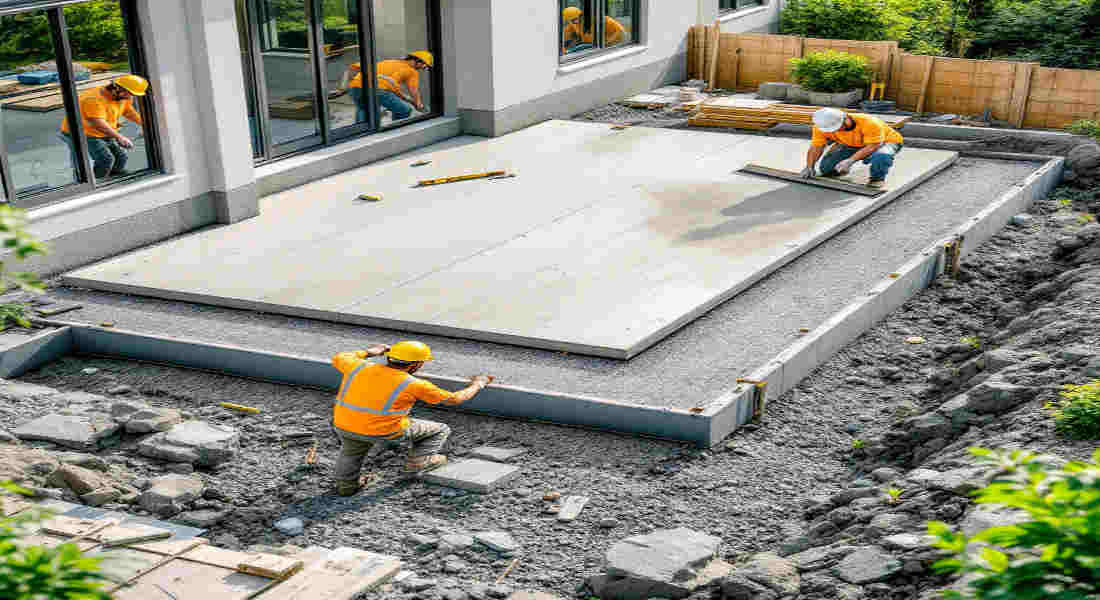
Essential Materials
Here’s what you’ll need:
- Concrete Mix: Choose a high-strength mix suitable for heavy-duty applications.
- Rebar: Steel reinforcement bars add strength to the slab.
- Hardcore: Crushed stone or gravel for the sub-base.
- Damp-Proof Membrane (DPM): Prevents moisture rising into the concrete.
- Formwork Timber: Used to shape and contain the concrete.
You may also read (my own garage at home).
Tools Required
- Shovel and rake for leveling the ground.
- Tamping tool for compacting soil and concrete.
- Screed board to level the concrete surface.
- Float trowel for finishing work.
- Wheelbarrow for transporting materials.
- Concrete mixer or pump for efficient mixing and pouring.
Safety Gear
Don’t forget to prioritize safety:
- Gloves to protect your hands.
- Protective clothing to shield against splashes.
- Eye protection to prevent injury from dust or debris.
Step-by-Step Guide: How to Lay a Concrete Base for a Home Garage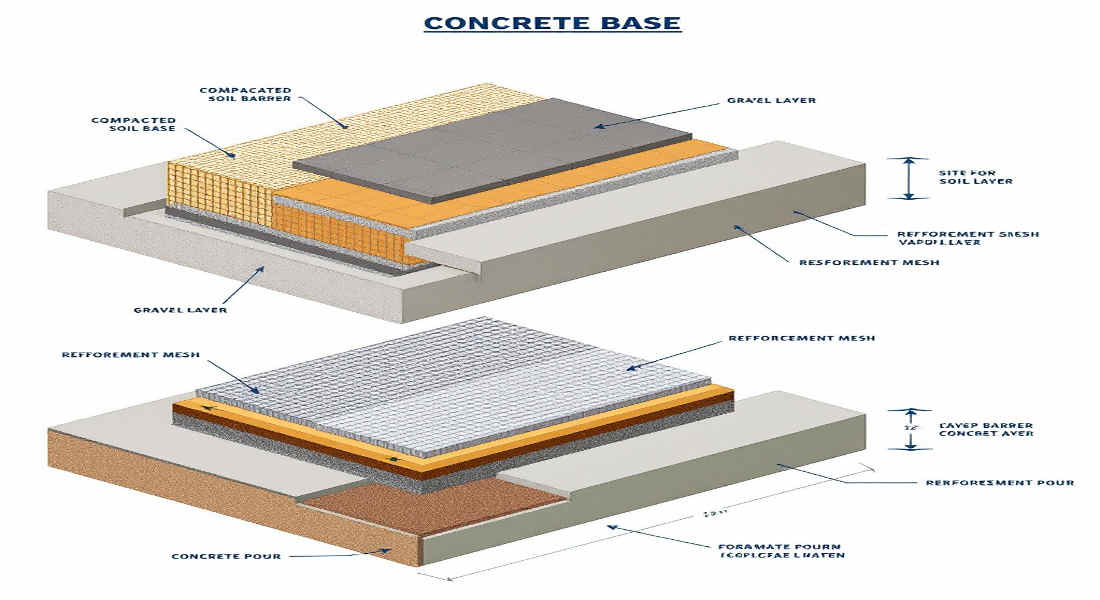
Site Preparation
- Mark the Area: Use wooden pegs and string to outline the base area.
- Clear the Site: Remove vegetation, rocks, and debris.
- Level the Ground: Ensure the surface is flat and stable.
Excavation
- Dig to the Right Depth: Typically, you’ll need to dig 6-8 inches to accommodate the sub-base and concrete.
- Remove Loose Soil: Compact the soil to create a stable foundation.
Laying the Hardcore Sub-Base and Damp-Proof Membrane
- Add Hardcore: Spread a 4-6-inch layer of hardcore for drainage and stability.
- Compact the Sub-Base: Use a tamping tool to compact the hardcore.
- Install the DPM: Lay a damp-proof membrane over the sub-base to prevent moisture ingress.
Constructing the Formwork
- Build Timber Frames: Create a frame to contain the concrete, ensuring it’s level and matches your desired dimensions.
- Account for Slope: Add a slope for water runoff (e.g., 1:100 gradient).
Reinforcement Installation
- Add Rebar: Place steel reinforcement bars within the formwork.
- Position Correctly: Use rebar chairs to keep the bars elevated and in place.
Calculating Concrete Volume
Use this formula to calculate the required concrete volume:
Volume = Length x Width x Depth
For example, a 10 ft x 12 ft base that’s 6 inches thick would require:
10 x 12 x 0.5 = 60 cubic feet of concrete.
Pouring the Concrete
- Plan Ahead: Schedule concrete delivery or mix it on-site.
- Pour Evenly: Distribute the concrete evenly within the formwork.
Tamping and Leveling the Concrete
- Compact the Concrete: Use a tamping tool to remove air pockets.
- Smooth the Surface: Use a screed board and float trowel for a level finish.
Curing the Concrete
- Retain Moisture: Cover with plastic sheets or damp hessian to prevent drying too quickly.
- Allow Time: Let the concrete cure for at least 7 days, with full strength achieved in 28 days.
Additional Tips and Best Practices
- Use Expansion Joints: These prevent cracking by accommodating temperature changes.
- Avoid Common Mistakes: Ensure proper leveling, compaction, and reinforcement to avoid structural failures.
- Check Weather Conditions: Pour concrete on dry, mild days to prevent rapid drying or freezing.
- Know When to Hire Professionals: If the project feels overwhelming, consider hiring experts for a flawless finish.
You may also read (electric home garage doors).